Showing posts with label Baking Illustrated. Show all posts

Tuesday, November 24, 2009

Chocolate Cream Pie


Chocolate silk pie and  tomato, basil and mozzarella panini sandwiches and macaroni and cheese... what do these have in common? Nothing, really!! But they made for one hysterical, fun, funny, crazy, flour filled day of baking. My friend Mo and I deiced to have a baking day marathon and this was are menu. We also made theses awesome cinnamon rolls.


This chocolate cream pie is rich and dark, creamy and oh so awesome! This is a classic R. family recipe. This is the chocolate cream pie page in their copy of Baking Illustrated. It is a very loved recipe! One of the things that makes this pie very delicious is the dark and rich chocolates.


Chocolate Cream Pie
Serves 8 to 10

For the best chocolate flavor and texture, we recommend either Callebaut semisweet and unsweetened chocolates or Hershey's Special Dark and Hershey's unsweetened chocolates. Do not combine the yolks and sugar in advance of making the filling - the sugar will begin to break down the yolks, and the finished cream will be pitted.


Chocolate Cookie Crumb Crust:
16 Oreo cookies with filling, broken into rough pieces (about 2 1/2 cups)
2 tablespoons unsalted butter, melted and cooled

1. For the crust: Adjust an oven rack to the middle position and heat the oven to 350˚ degrees. In a food processor, process the cookies with fifteen 1-second pulses, then let the machine run until the crumbs are uniformly fine, about 15 seconds. (Alternatively, place the cookies in a large zipper-lock plastic bag and crush with a rolling pin.) Transfer the crumbs to a medium bowl, drizzle with the butter, and use your fingers to combine until the butter is evenly distributed.
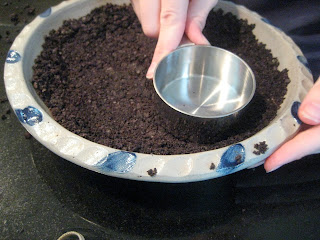
2. Transfer the crumbs to a 9-inch glass pie plate. Use  the bottom of a 1/2 cup measuring cup to process crumbs into the bottom and up the sides, forming a crust. Refrigerate the lined plate 20 minutes to firm the crumbs, then bake until the crumbs are fragrant and set, about 10 minutes. Cool on wire rack while preparing the filling.


Chocolate Cream Filling:
2  1/2  cups half-and-half
pinch salt
1/3 cup (2 1/3 ounces) sugar
2 tablespoons cornstarch
6 large egg yolks, at room temperature
6 tablespoons (3/4 stick) cold butter, cut into 6 pieces
6 ounces semisweet or bittersweet chocolate, finely chopped
1 ounce unsweetened chocolate, finely chopped
1 teaspoon vanilla extract

Whipped Cream Topping:
1  1/2 cups heavy cream, chilled
1  1/2 tablespoons sugar
1/2 teaspoon vanilla extract


3. For the filling:  Bring the half-and-half, salt, and about 3 tablespoons of the sugar to a simmer in a medium saucepan over medium-high heat, stirring occasionally with a wooden spoon to dissolve the sugar. Stir together the remaining sugar and cornstarch in a small bowl. Whisk the yolks thoroughly in a medium bowl until slightly thickened, about 30 seconds. Sprinkle the cornstarch mixture over the yolks and whisk, scraping down sides of the bowl, if necessary, until the mixture is glossy and the sugar has begun to dissolve, about 1 minute.  When the half-and-half reaches a full simmer, drizzle about 1/2 cup hot half-and -half over the yolks, whisking constantly to temper; then whisk the egg yolk mixture into the simmering half-and-half (the mixture should thicken in about 30 seconds).  Return to a simmer, whisking constantly, until 3 or 4 bubbles burst on the surface and the mixture is thickened and glossy, about 15 seconds longer.


4.  Off the heat, whisk in butter until incorporated; add chocolate and whisk until melted, scraping the pan bottom with a rubber spatula to fully incorporate. Stir in vanilla, then immediately pour filling through a fine-mesh sieve set over a bowl.  Using a spatula, scrape the strained filling into the baked and cooled curst. Press plastic wrap directly on the surface of the filling and refrigerate the pie until the filling is cold and firm, about 3  to 3  1/2 hours.


5.  For topping: When ready to serve, beat the cream and sugar in the chilled bowl of an electric mixer and medium speed to soft peaks; add the vanilla.  Continue to beat to barely stiff peaks. Spread or pipe the whipped cream over the chilled filling. Serve immediately.






Friday, November 20, 2009

Apple Pie Oh My


         I love fall! Growing up we would visit the Purdue Apple Farm and pick our own apples. Apples back then tasted different, thicker skins, juicy sweet white with red and green bits, and the apples tasted more like cider than store bought apples. I recently had (for the 1st time in many years) a Purdue apple, it was exactly the same!!!
        I remember that when Josh and I were very very young, Mom would take us with to listen to the Purdue Marching Band practices  (check out the videos) We had a picnic blanket and we would all spread out with fresh apples and snacks and listen to the music. Sometime we even brought our dog, Molly, with us to picnic. I don't know that she liked it as much as Josh and I did. I remember these picnics, the beautiful fall days and the amazing music as one of my most cherished memories with my mom and brother. 
        Despite the fact that apple pie was not really present in my childhood, eating apple pie reminds me of these days. We spent many afternoons in the shade of trees, listening to amazing fun, upbeat music and eating fresh apples. Happy Fall-ing in Love with Fall!


Classic Apple Pie
Baking Illustrated
Serves 8


1 recipe basic pie dough
2 tablespoons unbleached all-purpose flour, plus more for dusting the work surface
3 large Granny Smith apples (1 1/2 pounds)
4 large McIntosh apples ( about 2 pounds)
1 tablespoon juice and 1 teaspoon grated zest from 1 lemon)
3/4 cups (5 1/4 ounces) plus 1 tablespoon sugar
1/4 teaspoon freshly grated nutmeg
1/4 teaspoon ground cinnamon
1/8 teaspoon ground allspice
1/4 teaspoon salt
1 egg white, beaten slightly


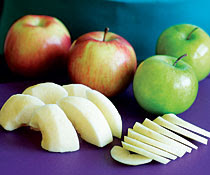
This picture from Fine Cooking shows exactly how to slice your apples.

1. Adjust an oven rack to the lowest position, place a rimmed baking sheet on it, and heat the oven to 500˚ degrees. Remove one pieces of dough from the refrigerator (of refrigerated longer than 1 hour, let stand at room temperature until malleable.)

2. Roll the dough on a lightly floured work surface between 2 large sheets of parchment paper or plastic wrap to a 12-inch circle. Transfer the dough to a 9-inch pie plate by rolling the dough around the rolling pin and unrolling over the pan. Working around the circumference of the pan, ease the dough into the pan corners by gently lifting the edge of the dough with one hand while pressing into the pan with the other hand. Leave any dough that overhangs the lip of the pie plate in place: refrigerate the dough-lined pie plate.

3. Peel, core and quarter the apples: cut the quarters into 1/4-inch slices and toss with lemon juice and zest.  In a medium bowl, mix 3/4 cup of the sugar, the flour, spices and salt. Toss the dry ingredients with the apples. Turn the fruit mixture, including juices, into the chilled pie shell and mound it slightly in the center.

4. Roll out the second piece of dough to a 12-inch circle: place it over the filling. Trim the edges of the top and bottom dough layers to 1/2 inch beyond the pan lip. Tuck the rim of dough underneath itself so the folded edge is flush with the pan lip. Flute the edge or press with fork tines to seal. Cut 4 slits in the dough top. If the pie dough is very soft, place the pie in the freezer for 10 minutes. Brush the egg white on the top crust and sprinkle evenly with the remaining 1 tablespoon sugar. I used Penzeys Vanilla Sugar.


                  Note: A double-crust apple pie is the quintessential American pie, but rarely do its looks match its flavor.  Too often, the pie is marred by crumbling edges, a cracked top and uneven borders, even before it goes into the oven. For an attractive pie, the top crust should be draped, not stretched across the top, and the bottom and top crusts must be sealed together to prevent juices from escaping. A clean crimping  of the edge is the finishing touch. Nice straight slits, evenly spaced across the top crust, allow steam to escape and prevent a soupy filling: they also provide an attractive decoration.

5. Place the pie on the baking sheet and lower the oven temperature to 425˚ degrees. Bake the pie until the top crust is golden, about 25 minutes. Rotate the pie from front to back and reduce the oven temperature to 375˚ degrees; continue baking until the juices bubble and the crust is deep golden brown, 30 to 35 minutes longer.

6. Transfer the pie to a wire rack; cool to room temperature, at least 4 hours.


If you want to spice up your pie, try these variations:

  • Add 3 tablespoons chopped crystallized ginger to the apple mix 
                                                 or
  • Macerate 1 cup raisins, dried sweet cherries, or dried cranberries in the lemon juice, adding 1 tablespoon applejack, brandy or cognac. Add into the apple mix
                                                or
  • Increase the sugar to 1 cup (7 oz) and adding 1 cup fresh or frozen cranberries to the apple mixture.
                                                or
  • Add in 1/2 teaspoon vanilla extract and 1/2 teaspoon of almond extract to the apple mixture. 


Basic Pie Dough:
For 1 double-crust 9-inch pies

2 1/2 cups (12 1/2 ounces) unbleached all-purpose flour, plus more for dusting the work surface.
1 teaspoon salt
2 tablespoons sugar
1/2 cup vegetable shorting, chilled
12 tablespoons (1 1/2 sticks) cold unsalted butter, cut into 1/4 inch pieces
6-8 tablespoons ice water

1. Process the flour, slat and sugar in a food processor until combined. Add shortening and process until the mixture has the texture of corse sand, about 10 seconds. Scatter the butter pieces over the flour mixture; cut the butter  into the flour until the mixture is pale yellow and resembles course crumbs, with butter bits no larger than small peas, about ten 1-second pulses. Turn the mixture into a medium bowl.

2. Sprinkle 6 tablespoons of the ice water over the mixture. With a rubber spatula, use a folding motion to mix. Press down on the dough with the broad side of the spatula until the dough sticks together, adding up to 2 tablespoons more ice water if the dough will not come together. Divide the dough into 2 balls and flatten each into a 4-inch disk. Wrap each in plastic and refrigerate at least 1 hour, or up to 2 days, before rolling.

Rolling and Fitting Pie Dough

  1. Using a tapered pin, roll a quarter turn, from 2 o'clock to 5 o'clock keeping your left hand stationary and moving the pin with your right hand.
  2. Turn the dough a quarter turn and roll again as in step 1. Continue rolling the dough s 8 or 9 inches in diameter.
  3. Using a bench scraper, life the dough onto the rolling pin, pick it up and re-flour the counter, and replace the dough upside down. Keep rolling until the diameter of the dough is 4 inches wider than the pie plate.
  4. Roll the doug over the pin and unroll it evenly onto the pie plate.
  5. After draping the dough evenly over  the pie plate, life up the edges of the dough and ease it down into the lower creases of the pan. Press lightly to adhere the dough to the sides of the pan. Or you can use the pre-made pie dough like me!